


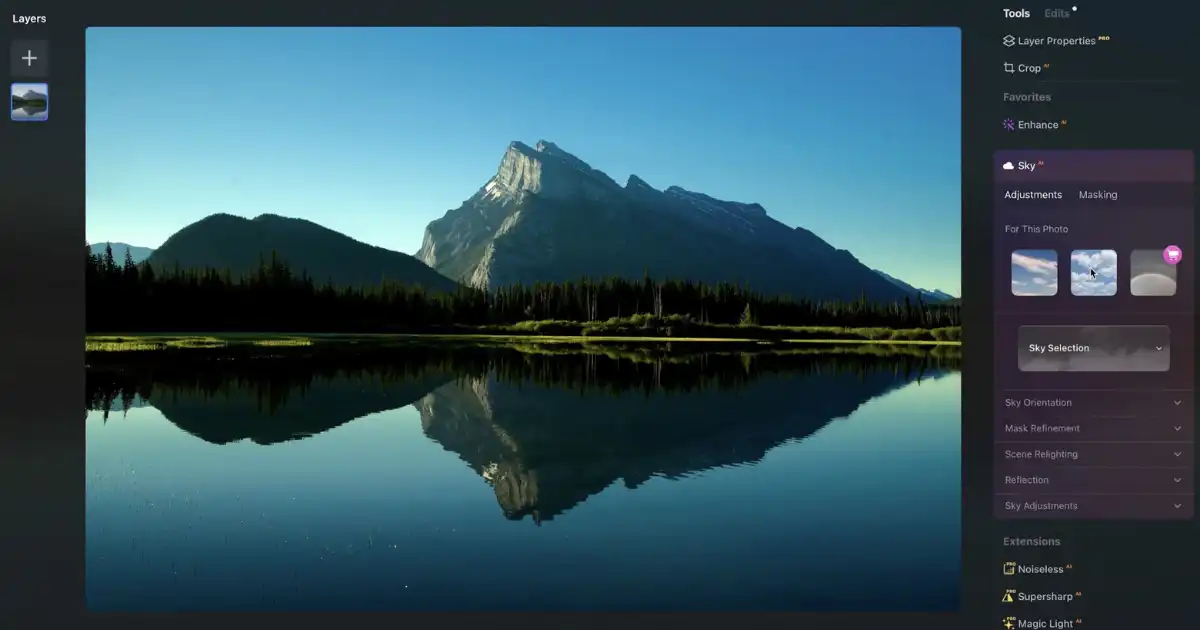
Imagine staring at your photos and seeing them come to life with dramatic skies, radiant sunsets, or captivating clouds. Most photographers struggle to get the sky to look perfect without spending hours in post-production. That’s where Luminar’s AI Sky technology comes in. With the AI Sky Enhancer, you can instantly breathe life into your images, turning ordinary landscapes into extraordinary visuals. This guide will walk you through everything you need to know to download the AI Sky Enhancer for Luminar, set it up, and start creating breathtaking photos effortlessly.
Whether you’re an aspiring photographer, a hobbyist, or someone who loves sharing stunning images on social media, mastering the AI Sky tool is a game-changer. No more fiddling with complicated settings or spending endless hours editing; the power of AI is here to make your sky look perfect every time.
Why the AI Sky Enhancer is Essential
The sky in a photograph can either elevate the entire image or make it look dull and lifeless. Manually adjusting skies requires advanced knowledge of color correction, gradients, and blending techniques. But with Luminar’s AI Sky Enhancer, all of that technical work is done for you.
The AI Sky tool uses cutting-edge artificial intelligence to:
-
Automatically detect the sky in any photo
-
Adjust brightness, contrast, and color to create a realistic effect
-
Preserve details and textures while enhancing the sky
-
Integrate seamlessly with other Luminar tools like AI Structure, Accent AI, and AI Enhance
This makes it a must-have for anyone looking to improve their photo editing workflow. The AI Sky technology allows you to achieve professional results without being a professional. Even beginners can take a dull sky and transform it into a cinematic masterpiece in seconds.
Experience the Magic of Sky Enhancement
Imagine turning a gray, overcast morning shot into a golden sunset or a cloudy sky into a moody masterpiece. With Luminar’s AI Sky Enhancer, this isn’t just possible—it’s simple. The tool’s smart algorithms analyze your photo and make subtle, realistic adjustments that bring your sky to life.
Here’s why photographers love the AI Sky:
-
Realistic Adjustments
Unlike traditional filters, the AI maintains the natural look of the scene.
-
Time-Saving
One click can replace hours of manual editing.
-
Flexibility
You can tweak the intensity to achieve the exact look you want.
-
Seamless Integration
Works perfectly with Luminar’s other AI-powered tools.
The AI Sky can dramatically improve your workflow, making it easier than ever to produce images that captivate viewers and stand out on social media, portfolios, and prints.
Step 1: Choose Between Luminar AI and Luminar Neo
Before accessing the AI Sky Enhancer, you need Luminar installed on your computer. Luminar comes in two versions:
Luminar AI
Luminar AI is designed for quick, AI-driven photo editing. It’s perfect if you want to improve images fast without diving deep into technical adjustments. With tools like AI Sky Enhancer, Accent AI, and AI Structure, Luminar AI is ideal for beginners and enthusiasts.
-
Download Link: Luminar AI
Luminar Neo
Luminar Neo is the next-generation photo editor, offering a modular engine and advanced AI tools. With features like Sky AI, Atmosphere AI, and Face AI, it provides more flexibility and professional-grade editing capabilities.
-
Download Link: Luminar Neo
Choose the version that best suits your editing needs. Both versions include the AI Sky tool, so either one works.
Step 2: Install the Software
After downloading the installer, follow these steps:
-
Locate the Installer
Find the
.exefile for Windows or.dmgfile for Mac. -
Run the Installer
Double-click the file to start installation.
-
Follow the Prompts
Click “Next” and accept the terms to install.
-
Launch Luminar
Once installed, open the app from your desktop or applications folder.
It’s recommended to restart your computer after installation to ensure all components are properly configured.
Step 3: Activate Your License
To access all features of Luminar, including the AI Sky Enhancer, you need to activate your license:
-
Open the Application
-
Sign in with Your Skylum Account
-
Enter Your License Key if prompted
-
Activate the Software
Once activated, you have full access to all AI tools, including AI Sky.
Step 4: Using the AI Sky Enhancer
Now that Luminar is installed and activated, here’s how to use the AI Sky:
-
Import Your Photo
Click “Add Photos” and select the image you want to edit.
-
Open the AI Sky Enhancer
Navigate to the “Edit” tab and select AI Sky Enhancer.
-
Adjust the Slider
Move the slider to enhance the sky. The AI automatically detects and adjusts the sky’s brightness, contrast, and color.
-
Fine-Tune
Adjust other settings if needed to get the perfect look.
Luminar’s AI Sky works on any photo, whether it’s landscapes, cityscapes, or portraits with visible skies.
Tips for Best Results
-
Use High-Resolution Photos
The AI works best with clear, detailed images.
-
Avoid Obstructed Skies
Photos where the sky is heavily blocked by objects may require manual tweaks.
-
Subtle Enhancements
Avoid overdoing it; the AI is designed to maintain a natural look.
-
Combine with Other AI Tools
Use Accent AI or Structure AI for overall image enhancement.
Advanced Techniques
Replacing the Sky
Beyond enhancing the existing sky, Luminar also allows you to replace the sky entirely. Using Sky AI, you can select from a library of skies or import your own.
Blending Adjustments
Use layers and masking to blend sky enhancements with the foreground for seamless results.
Color Matching
Luminar’s AI ensures the sky matches the tones and lighting of your original photo, maintaining realism.
Practical Applications
-
Landscape Photography
Transform dull skies into dramatic sunsets or stormy clouds.
-
Real Estate Photography
Make properties look more inviting with vibrant skies.
-
Travel Photography
Enhance skies to match the mood of your destination.
-
Social Media Content
Stand out with professional-looking images.
You Might Be Interested In
- Prompt Management 101: Versioning, Environments, And Safe Rollouts
- 77 Product Name Ideas With Ai
- What Are Agentic Ai Systems And How Do They Work?
- How Do Data Centre Memory Systems Work?
- Best 5 Robo-advisors Outperforming Human Analysts
- How Vibe Coding Works: Building Apps with Prompts Instead of Code
- Best Ai Writing Tools For Blogs (2026)
- What Are Ai Tools That Write Policies?
- How Do Vector Search Algorithms Improve Data Retrieval?
- System Prompt Leakage: Common Failure Modes And How To Harden Against Them
Conclusion
Luminar’s AI Sky Enhancer is a revolutionary tool for photographers at any level. From beginners to professionals, it saves time, simplifies the editing process, and produces stunning results. By following this guide, you now know how to download, install, and use the AI Sky Enhancer, transforming ordinary images into extraordinary works of art.
The AI technology ensures your skies look natural while allowing creative freedom, making it an essential addition to any photographer’s toolkit. Whether you want subtle improvements or dramatic transformations, Luminar’s AI Sky opens a world of possibilities for creating photos that truly captivate.
Take action today, download Luminar, and experience the magic of AI-driven sky enhancement. Your photos—and your audience—will thank you.
FAQs about Ai Sky
How to download Luminar AI?
To download Luminar AI, first, you need to visit the official website of Skylum, the company that makes Luminar AI. Once you are on the website, look for the “Download” or “Get Luminar AI” button. You might need to create an account or sign in if you already have one.
After that, choose the version compatible with your computer, either Windows or Mac, and start the download. Once the file is downloaded, open it and follow the instructions to install the software. After installation, you can launch Luminar AI and start exploring its features. It is important to make sure your computer meets the minimum system requirements, so the program runs smoothly without any issues.
How to add skies to Luminar AI?
Adding skies in Luminar AI is simple and fun because it uses AI technology to help your photos look more professional. First, open the photo you want to edit in Luminar AI. Then, look for the “Sky AI” or “Sky Replacement” option in the editing panel. From there, you can select a sky from the built-in collection or upload your own image.
The software automatically detects the sky area in your photo and replaces it with the new one. You can adjust settings like brightness, color, and reflections to make the new sky look natural with the rest of your picture. This makes it easy to completely change the mood of your photo with just a few clicks.
Where is sky AI in Luminar Neo?
In Luminar Neo, Sky AI is one of the main tools for replacing or enhancing skies in your photos. To find it, open your photo in Luminar Neo and look at the right-hand panel where all the editing tools are listed. Sky AI should appear under the creative or tools section. Once you click on it, you will see different sky options and settings to adjust how the new sky blends with your photo. The AI automatically detects the edges and lighting in your image to make the replacement look realistic. You can also make further adjustments like changing the sun position, adding reflections, or adjusting mood to make the scene more dramatic or natural.
Is Luminar AI free?
No, Luminar AI is not free. It is a paid software, which means you need to purchase it to use all its features without restrictions. Skylum sometimes offers a free trial, which allows you to test the software for a limited time before buying. During the trial, you can explore many tools and see if it meets your needs. After the trial ends, you will need to pay for the full version to continue using the software. While it is not free, many photographers find it worth the cost because it offers advanced AI editing tools that save a lot of time and make photos look professional.
Is AI Enhancer free?
AI Enhancer is a feature within Luminar AI, not a separate program, so it is included with the software. If you have Luminar AI installed, you can use AI Enhancer without paying anything extra. It helps improve your photos automatically by enhancing details, color, and brightness, making your images look sharper and more vibrant. However, since it is part of Luminar AI, you need to have the software purchased or in a trial version to access it. Using AI Enhancer is easy and can save you time if you want quick improvements without manually adjusting every detail.
